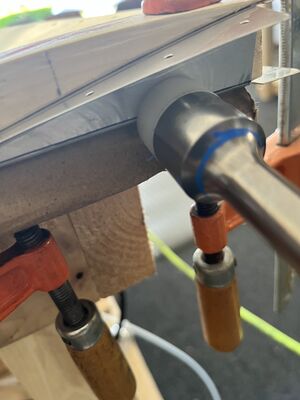
- Make a wooden trim tab template verbatium from the the templates. Use this on the inside of the area to be bent. Now put a reverse wedge on the top so the clamps will work. Now the outboard end is square (90 deg) so offset 1/32 as illustrated then clamp to table FIRM, and bend with wood block. I skipped the double sided tape as I was able to precisely clamp w/ 1/32 offset. I used a plastic peen on the rivet gun set to 40 psi. Bend the bottom first. Use the plastic peen to sharpen the edge of the bend. - Now bend the top down match drill.
- Make a wooden trim tab template verbatim from the templates. Use this on the inside of the area to be bent. Now put a reverse wedge on the top so the clamps will work. Now the outboard end is square (90 deg) so offset 1/32 as illustrated then clamp to table FIRM, and bend with wood block. I skipped the double sided tape as I was able to precisely clamp w/ 1/32 offset. I used a plastic peen on the rivet gun set to 40 psi. Bend the bottom first. Use the plastic peen to sharpen the edge of the bend. - Now bend the top down and match drill.
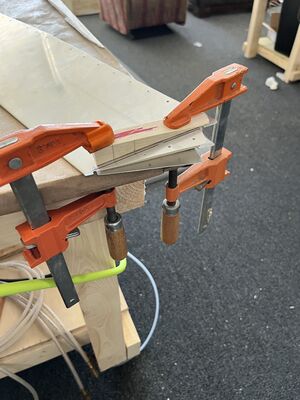
- When doing the other end, draw a line w/ sharpie from the angle edges. Put the wood block in at the same angle as the line. Clamp to the table same as other end. Clamp it FIRM.
- When doing the other end, draw a line w/ sharpie from the angle edges. Put the wood block in at the same angle as the line. Clamp to the table same as other end. Clamp it FIRM.
Line 21:
Line 21:
'''Section 9-17 Step 2:'''
'''Section 9-17 Step 2:'''
I used my buddy's 90 deg "shear/brake" with a 1/4-1/2" angle iron. I slightly opened up the trim tab while gently bending to 15 degrees. Came out ok. Better then just doing with duck bill pliers.
I used my buddy's 90 deg "shear/brake" with a 1/4-1/2" angle iron. I slightly opened up the trim tab while gently bending to 15 degrees. Came out ok. Better than just doing it with duck bill pliers.
*[[File:5523 Elev Trim Tab2.jpg|thumb|Elevator Trim Tab Peening]][[File:2022-03-28 16-10-02.jpg|thumb]]''links coming soon''
*[[File:5523 Elev Trim Tab2.jpg|thumb|Elevator Trim Tab Peening]][[File:2022-03-28 16-10-02.jpg|thumb]]''links coming soon''
- Make a wooden trim tab template verbatim from the templates. Use this on the inside of the area to be bent. Now put a reverse wedge on the top so the clamps will work. Now the outboard end is square (90 deg) so offset 1/32 as illustrated then clamp to table FIRM, and bend with wood block. I skipped the double sided tape as I was able to precisely clamp w/ 1/32 offset. I used a plastic peen on the rivet gun set to 40 psi. Bend the bottom first. Use the plastic peen to sharpen the edge of the bend. - Now bend the top down and match drill.
- When doing the other end, draw a line w/ sharpie from the angle edges. Put the wood block in at the same angle as the line. Clamp to the table same as other end. Clamp it FIRM.
Section 9-17 Step 2:
I used my buddy's 90 deg "shear/brake" with a 1/4-1/2" angle iron. I slightly opened up the trim tab while gently bending to 15 degrees. Came out ok. Better than just doing it with duck bill pliers.