Door Locks / Hinges / Handles
Jump to navigation
Jump to search
Locks & Keys
See Door Locks for more information.
Seals
Cabin Door Seals
- Many builders decide to put the door seals on the fuselage side instead of onto the inside of the door.
Two McMaster order numbers are being used: 1120A311 (lip on inside, 3/16 edge thickness, 3/8 high):


1120A311 and 1120A313 (lip on outside, 3/16 edge thickness, 3/8 high). Since you are building up the inside edge, the lip is better being on the inside as the groove for it will automatically form when using a throwaway seal as mold. Consider trimming the lip down, both when doing the mold, and the final install. The full lip makes it hard to get the final seal seated. The trimming can be done with a jig where you have a utility knife blade stick out of a wooden board plus left and right guides, so you only need to pull the seal through the jig once.
Some builders prefer the 1120A411 variant which is for 1/4 edge thick edges. The 311 variant works fine to about 0.2" wall thickness meaning some areas (i.e. the bottom edge) need a bit of inside wall trimming.
Builders usually sacrifice one set of seals as mold to form out the edges, then replace it with a clean second set. You need about 12 ft per door. This procedure will need at least 4 x 12 ft., most builder buy a bulk pack with 100 ft for future seal maintenance as some builders experience a gap where the ends meet after some time, see this FB thread. Consider placing the gap behind the gas strut attach bracket.
After you have your doors sit flush, and the hinges and door pins are installed, you mark a line on the canopy 0.285" back from the door's inner skin. This is the minimum distance so the seal's push-back isn't making it too hard to close the doors. The maximum distance should be 0.385". Trimming to the minimum line will make the canopy rim very thin in some areas, but with the sacrificial seal method, the inside wall will be built back up to the nominal 3/8 or 1/4 depending on the seal order number. The McMaster seal requires the hinge pockets to be closed. There are several ways to accomplish this, some are permanent which means you have to remove the door hinges on the canopy side, some prefer removable caps, see also 3D-Printed Tools and Parts. See also:- FB thread
- Mark's builder log
- VAF thread
- VAF thread
- Glen's builder log
- Justin Twilbeck's log
- BuildFlyGo's video
- Ivan Kristensen's video with door trim measurements
- Ivan Kristensen's door seal photos (now on smugmug, no longer on ivankristensen.phanfare.com). The sparse text for photos is available on the web archive.
- Les Kearney's door seal compilation pdf (originally posted to the Matronics mailing list)
- FB thread


- Some builders use the standard Vans way of putting the seals on the doors but use better seals sold by McMaster.
- See VAF thread
Luggage Door Seals
- Aircraft Door Seals

- See also this VAF Thread
- See also this FB Post

Door Strut Upgrades
- Upgraded strut brackets (especially useful if you use McMaster door seals)
- Heavy Duty Door Strut from Vans (600 instead of 500N)
- Bansbach easylift door strut A1A1F50-100-287 part#10017Y1 (600N instead of 500N, call to order)
- Ordering 650N at Bansbach: Select the 650N version of B0N0F50-100-247/XXXN, add 2 of those, then add 4 of the end fittings A1 M8 Aluminum Hinge Eye Endfitting. These end fittings yield a total length of the 287mm similar to the other fully assembled struts. First timers can try coupon code 15PERCENTOFF. If you use the upgraded strut brackets, the Bansbach end fittings need to be trimmed back on the canopy side. Ensure that the gas strut has enough play at the upgraded strut bracket side so it can swivel a tiny bit. When the door opens, the gas strut will be forced a bit sideways as the hinge line of the door and hinge line of the upgraded strut do not 100% align.
- Tim Olson's build page on struts
- Door strut hardware (FB 3/22/2022)
- See also this FB thread.
Hinges
- Machined hinge capture plates make removing and re-installing the doors much easier
- Airward hinge reinforcement kit, see this [FB thread 1/2024
- See also the 3D-Printed_Tools_and_Parts section for 3D-printed caps to close out the hinge pocket on the door to accommodate McMaster seals.
Other Enhanced Door Parts / Kits / Upgrades
- Aerosport Products
- Planearound, see also this FB thread
180 Degree Door Latch and Low Profile Handle Hints
- All-In-One documentation
Don't miss to check the documentation set at Planearound which includes a link to a document written by David Peterson which is a revised Vans chapter 45 document with all the various modifications compiled in. The chart that goes along with the document is also referenced there. - Tools needed
- Drill bit to upsize 7/16th door lock pin hole to 11/16th: a 5/8th countersink bit works great, e.g. at HomeDepot
- 7/16 reamer to upsize the door pin holes in the fuselage, e.g. at Amazon
- Additional documentation
Damazio's write-up of the 180 degree door latch install. He uses a string to guide the long end rack into the center cam gear box. 20/1000 safety wire works great, too. - Videos
- Ed's low profile door handle install (Note: The 180 degree Delrin handle part has changed, the E-clip now runs against the Delrin, not the strike plate)
- Austin's door latch and handle install
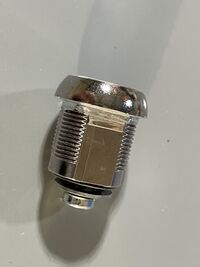
- Door lock or outer ring (bezel) not sitting flush
The Aerosport door handle kit assumes a bonded wall thickness of approximately 0.160 inches. It does not include a mechanism to accommodate deviations from this thickness.
If the door mechanism holes are drilled prior to bonding, and clecos are used during curing, the door halves may compress tightly in the lock area. This can result in a final wall thickness of only about 0.112 inches—leaving a 0.050-inch discrepancy. This difference will cause the outer lock cover to sit proud and not flush with the surface.
Conversely, if your wall thickness exceeds 0.160 inches, the lock cylinder will sit recessed within the outer cover.
For doors with thinner walls, a workaround is to trim the collar of the lock so it can sit further down on the steel strike plate (see pictures below). Trimming can be done with a Dremel carbide wheel (e.g. at Home Depot) and a file to make the transition square. It may also be necessary to slightly trim the 3 protruding studs of the outer ring (bezel) back for it to sit flush (see pictures below). For doors with thicker walls, consider designing a 3D-printed collar around the lock cylinder that will raise it to be flush with the cover. Modifications to the lock placement requires also modifications to the lock's latch as the pre-bent latch included in the low profile handle kit makes assumptions about the lock's position.
See also this FB Post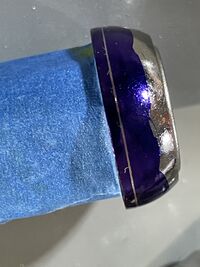
- Door handle cover modifications
PlaneAround 180 degree latch together with Aerosport interior door handle beauty cover causing binding (FB 10/11/2022) - Low profile door handle hints
- The outside spring gets between the moving shaft and the low profile door handle. This may cause the inside roll pin not sitting down all the way into the cutout of the steel plate, therefore not properly securing the door handle in the locked position. Consider bending the narrow side of the spring more open so it easily slides over the shaft, and insert the narrow part of the spring first.
- The roll pin may on first insertion not find the far end exit hole because the initial thickness of the elevated area on the back side of the door handle is preventing the door handle to sit down far enough into the handle enclosure. Very careful sand off the elevated area until the pin inserts properly, and without causing any binding during the handle operation. Grinding the area down too far may foil your attempt to tune the down resting point of the handle so it just doesn't touch the outer skin in the locked position.
- Threads
- PlaneAround FB thread
- Low profile handle + 180 degree FB thread 6/2023, FB thread 9/2023 FB thread 11/2023

